

Flow Builder is a fantastic tool that allows you to create automation in your Salesforce environment without having to write code. You can learn to use it quite effectively with the lessons on Trailhead. Even a few simple flows can save end users hours of repetitive clicking work each week. So, it is definitely valuable for admins to learn how to work with this tool.
The basics of building flows is easy and quick to learn, but making mistakes is also easy. It would be a shame if users see an unhandled error half of the time, without any indication of what went wrong. That's why in this article, we will have a look at the potential causes of Flow Errors, how to prevent them, and how to handle errors that you cannot foresee or prevent.
Oh, one little thing before we begin:
Always experiment in a sandbox and never in the production org!!
Causes for Errors
Unretrieved / unavailable data
In your flow, you undoubtedly use field values from records in lookup filters, decisions, assignments, or another building block of your flow. But if that value was not retrieved or does not exist, it will not work.
When debugging, you often find this out quickly, but don not rely blindly on one test with the so-called 'happy flow' that you perform as yourself (system admin). You usually test with clean test records where the fields and relationships you need are filled in, but in daily practice, data is not always that clean.
Best Practice 1: Null Checks
Use decisions to check if the flow has indeed been able to find the record and field values you need. Let the flow continue only if the required data is available.

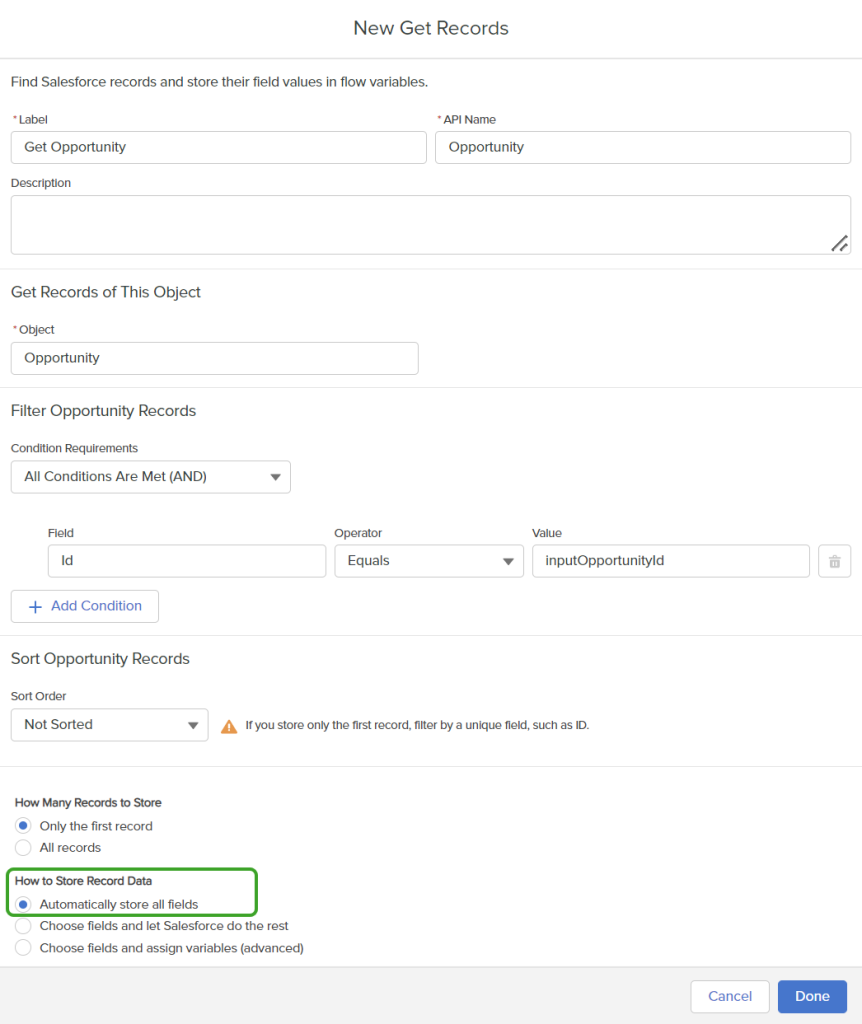
Best Practice 2: Automatically store all fields
When you retrieve records, when asked How to Store Record Data select Automatically store all fields. This way, the flow creates the record variable itself and you automatically have all fields, including the fields from parent records, at your disposal. This also means that if you retrieve an Opportunity or Contact, you get the Account and fields on that Account for free, so you don't need to use another Get Records element for that.
Read and write permissions
Even if your flow neatly retrieves the records and fields you need, it can still happen that the flow works fine for you but not for other users. This could be due to the read permissions that the user's profile has on the object or field. When building flows, you generally have a System Administrator profile, and that profile gives you View All Data and Modify All Data permissions. Regular users typically don't have these permissions, as they shouldn't.
Best Practice 3: Debug as user
Therefore, debug your flow as a user who will eventually be using it. Different people with different profiles and permission sets will be using it. Test it for all different rights packages.

The ability to debug flows as another user can be enabled in Process Automation Settings.

Rights at the object level: profiles or permission sets
If a user lacks certain access, you can manage the rights to read, create, edit, or delete an object in their profile or in a permission set.
Rights at the field level: Field level security
Access at the field level cannot be set in a permission set. You can do this per field in the Object Manager. Go to the appropriate object > Field and Relationships, click on the field you want to edit the access for, and click Set Field-Level Security. Here, you can set whether the field should be visible and readable per profile.

You can give users access to see or edit a field within a flow, but make it invisible or read-only on the Page Layout or Lightning Page for that user, so they cannot read or edit it in the normal view.
Another way is to make the flow work in System Context . This is an option you can choose under Advanced when you save the flow.

Record access
In addition to access to the object and field, record-level access also plays a role. Sometimes records are not visible to all users but only to the owner. Or they are visible to everyone but not all users can edit them.
If you notice during debugging that a user is getting stuck in the flow for this reason, check whether the user should be able to see and/or edit such records within the flow, or if this limited access is correct.
If you want to make an exception within the flow, you can have the flow run in System Context Without Sharing.

Validations
When creating or editing a record, you may also encounter an issue if the record you want to save does not meet validations. By validations, I mean more than just validation rules:
- Attempting to save a record with a required field left blank
- Attempting to save a record with a value in a restricted picklist that is not in the list of valid options
- Attempting to save a record that does not comply with a validation rule
If you encounter such an error message during debugging, you will clearly see it in the debug log.
Best Practice 4: Picklist Choice sets
A good way to prevent incorrect picklist values is to use a picklist choice set in screen elements where the user needs to fill in such a picklist. This avoids the need for modification when adding, changing, or deactivating choice list values.

If there are validation rules for a specific field, use a validation on the input field in your flow. The validation rule is not exactly the same because the fields in the flow are written slightly differently in terms of parentheses, and because validations in a Flow Screen Element work in the opposite way of validation rules in the Object Manager.
A validation rule in the Object Manager displays the error message if the formula's outcome is TRUE and approves the record if the formula's outcome is FALSE.
Here, you describe when the input is incorrect.
A validation rule in a Screen Component in your flow approves the input when the formula's outcome is TRUE and displays the error message when the formula's outcome is FALSE.
Here, you describe when the input is correct.


In the above example, you see two differences. In the Object Manager, you simply use the field API name (in this case, Phone). In Flow Builder, the API name of the input component is enclosed in curly braces with an additional exclamation mark at the front: {!Phone}.
Not all input field types in Flow Screen Components have the ability to validate the input. A Phone component does not have this, and even if you define in the component which field the input is stored in, the validation rules that apply to that field are not checked within the flow.
Gebruik je in je screen Dynamic Forms om de velden van een record variabele zelf er direct in te zetten, dan worden de validatieregels zoals in de Object Manager gedefinieerd wel gecheckt voor het veld in kwestie.
Therefore, use regular text and number components for the input of fields to which validation rules apply.
Limits
Flow Builder is subject to limits. Exceeding these limits also results in error messages. You can find all the limits you need to consider here:
https://help.salesforce.com/s/articleView?id=sf.flow_considerations.htm&type=5
The two main limits you need to consider while building your flow are:
- Up to 100 SOQL queries (get data from the database)
- Up to 150 DML statements (edit data in the database: create, update or delete records)
Both count per Flow Transaction.
What is a Flow Transaction
A Flow Transaction encompasses everything that happens between:
- Screenflow:
- Starting the flow and displaying a screen to the user
- Between two successive screens
- Between the last screen and the end of the Flow Interview
- Record Triggered and Autolaunched Flows:
- The trigger that sets off an initial record update, plus all the actions triggered by it, and the actions subsequently caused by those changes until no new actions are added to that cause-and-effect chain.
This means the transaction may already have started before your flow begins and can also continue after the actions in your flow.
So, delve into how changes that your (Record Triggered) Flow responds to can occur, and what other Flows and Processes subsequently react to the changes caused by your Flow.
To make this manageable, it can help to run record-triggered flows asynchronously wherever possible and use the Flow Trigger Explorer to put the various flows in a convenient sequence.
What is a Flow Interview?
A Flow Interview is everything that happens from the start element to the end element in the flow. It doesn't need to be the same for every interview of the same flow. Decisions and their subsequent paths can touch many more elements at times than at others.
In loops, an element in the loop (including the loop element itself) is counted each time it's revisited. The number of records in the loop also affects how many elements are touched in total in the flow.
Although the limit of a maximum of 2,000 touched elements in a Flow Interview no longer exists, there is still a time restriction of up to 10 seconds. Because of this, it's good practice to ensure that parts of a Flow that run without user interaction do not exceed that duration. You can achieve this by limiting the number of records that can pass through the loop in a single interview.
I will delve into loops in flows in another article.
Measures to avoid exceeding limits:
- Do not use more Get Record elements than strictly necessary.
- As mentioned at the beginning of the article, you automatically get the fields from parent records.
- Use record variables as input variables for subflows instead of just using the Ids. Often, the parent flow already has the record variable you need fully available. You simply pass it on to the subflow.
- Never use a loop within another loop (without filtering)
- This exponentially increases the number of iterations in the loop, and those 10 seconds might sometimes be exceeded before the Flow Interview is finished.
- If you do need a nested loop, use a Collection Filter element between the outer and inner loop elements. Let the inner loop work with the filtered collection. This way, the inner loop, if properly filtered, will only be executed for the records that are relevant to the current record of the outer loop.
- If there seems to be no other solution, involve a developer to build a solution in Apex for you. Often, this doesn't need to cover the entire process from start to finish, but you can isolate a part that is not achievable with Flow Builder. If the relevant method in Apex is made 'invocable', you can use it within your flow just like including a subflow.
- Never use a Get, Create, Update, or Delete element within a loop
- Instead, add the individual record variable to a record collection variable and update the entire record collection in a single Create, Update, or Delete element after the loop ends.
- Consult an experienced admin, consultant, or developer for scenarios where it seems you need to get records within a loop. You might need a piece of code that can be included as an Action in the Flow, but perhaps your experienced colleague can solve it differently.
- Be careful when using a Record Update element
- If there have been no actual changes to the record, do not perform the update.
- You can achieve this by using a decision to check if any of the Assignments that set values for the records to be updated has been touched. If yes, then you can update. If no Assignments have been visited that set values for the record, then updating is not necessary.

Fault Paths
Perhaps you cannot foresee all potential issues in advance. You don't know what you don't know. So, it is always a good practice to use error paths so that if the user does encounter an error, it's not just a vague "unhandled fault."

From all pink elements with database interaction and all actions, you can draw error paths.

Here, for example, you can:
- Show the user a screen that provides more information about the problem
- Share the error report with other users, such as yourself or an external consultant
- Save it in a custom object record
- Send a custom notification
- Share it via chatter
- Send it via email
- Execute a rollback that undoes all changes made to records during the flow interview.
You can also organize error handling in a subflow that you can call from any flow. You can choose to create a version with a screen for Screen Flows and a version without screens as a subflow for non-screen flows.
The advantage of saving a Fault log in a custom object record is that you can find it within the org and link it to a case, allowing you to track whether the cause has been resolved.
The flow below is just an example. In this flow, the error report is captured in a record of the custom object "System Log." Then, the user doesn't see the entire debug log, but the System Log number is shared on a screen with the request to provide this number to the Admin when reporting the issue.
The error report, which is essentially what you see when debugging, is available in the flow as the variable: {!$Flow.FaultMessage}.
You are in the best position to assess which method of capturing and communicating errors works best for you and your users.
Error paths in flows can only be created from pink blocks and Actions.
An error can also occur in an assignment, decision, screen, record sort, or collection filter element, and it can also be within a formula or text template in the flow. There are no error paths to connect to those places, so you need to remove possible errors from those locations in advance by thorough debugging.
Hopefully, these tips will help you build well-functioning flows and analyze and resolve issues that may arise more efficiently.