
In this series we are building a Monopoly game in Salesforce. Using this example we explore all kinds of skills that are important to develop as an Admin or Consultant.
In the first part we laid the groundworks for the datamodel of our Monopoly app. In the second part we took care of the user interface with a custom app and the page layouts.
The last step before we dive into the actual playing of the game, is data. After all we need some data when we start building our flows to test if they work as intended. Also the custom app we built in episode 2 will come to life if there are actual records.
When creating data, you should start at the top of the object hierarchy. Looking back to our datamodel we built in episode 1, we can see there are 4 objects that do not have any relationships to parent objects.
- Board
- Player
- Rule
- Asset Group
We should create the records of these objects first before we can create records that look up to these. That way we can populate the relationship to the parent record when first creating those child records.
Board
We will start out with the board. Because we just need one single board, we will just create this in the user interface. Whether you prefer this over importing depends a bit on the number of fields you need to populate and your own personal taste. The board just needs a name, so importing would not be efficient here.
Asset Groups
We will look at Players and Rules later. First the Asset Group's. Then the Assets. After we have imported assets, we can import Positions and then board will really take shape.
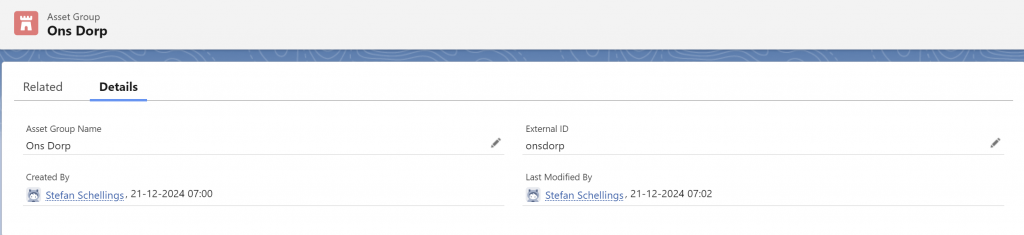
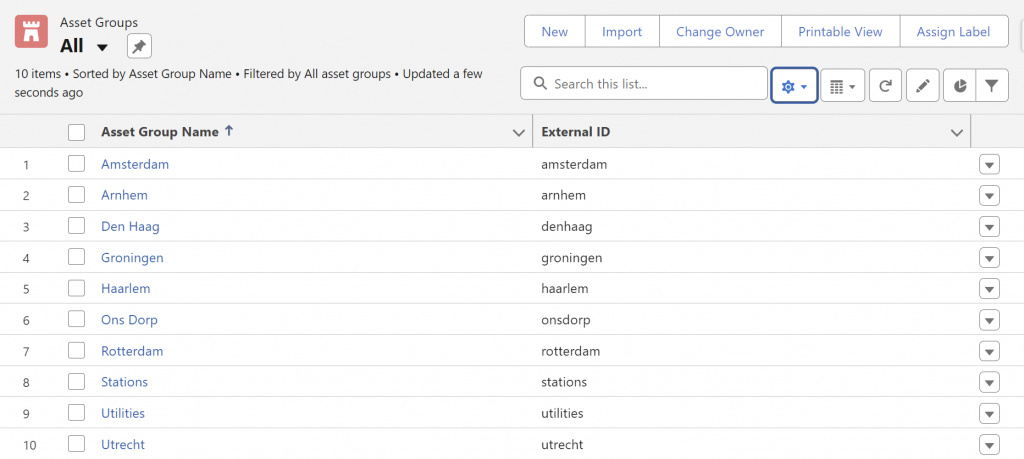
There are 10 Asset Groups, the 8 cities, utility companies and the train stations. We create the first record manually. in het vorige deel van deze serie.
Now that we have access to the Assets tab, I will navigate there, click the New button and create the first Asset Group.
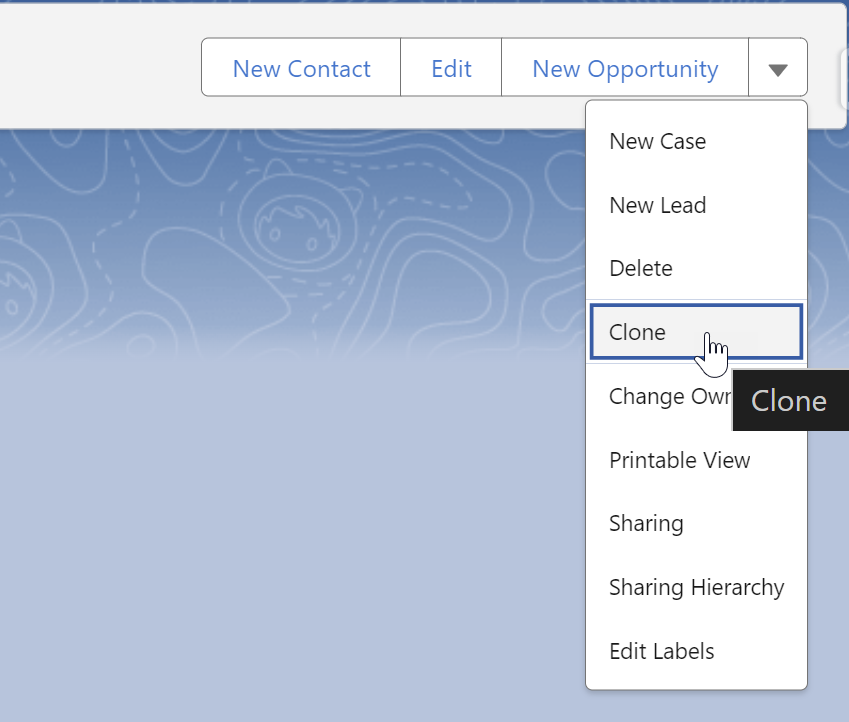
As long as only one or two values differ between the various records of an object, cloning and editing the cloned record is also a relatively quick option.
We apply this approach to the Asset Groups. These only have a name and an External ID. For all External IDs, I will maintain a consistent format: entirely in lowercase letters and without spaces. Thus, the External ID for the Asset Group Den Haag will be denhaag.
Assets
We have a total of 28 Assets, each with 5 fields containing values that are largely unique to each record. In this case, importing will be a more efficient approach.
We use Salesforce Inspector Reloaded for exporting and importing, and Excel to prepare the records for import. In this earlier blog, you can read how to install and use the browser plugin Salesforce Inspector Reloaded..
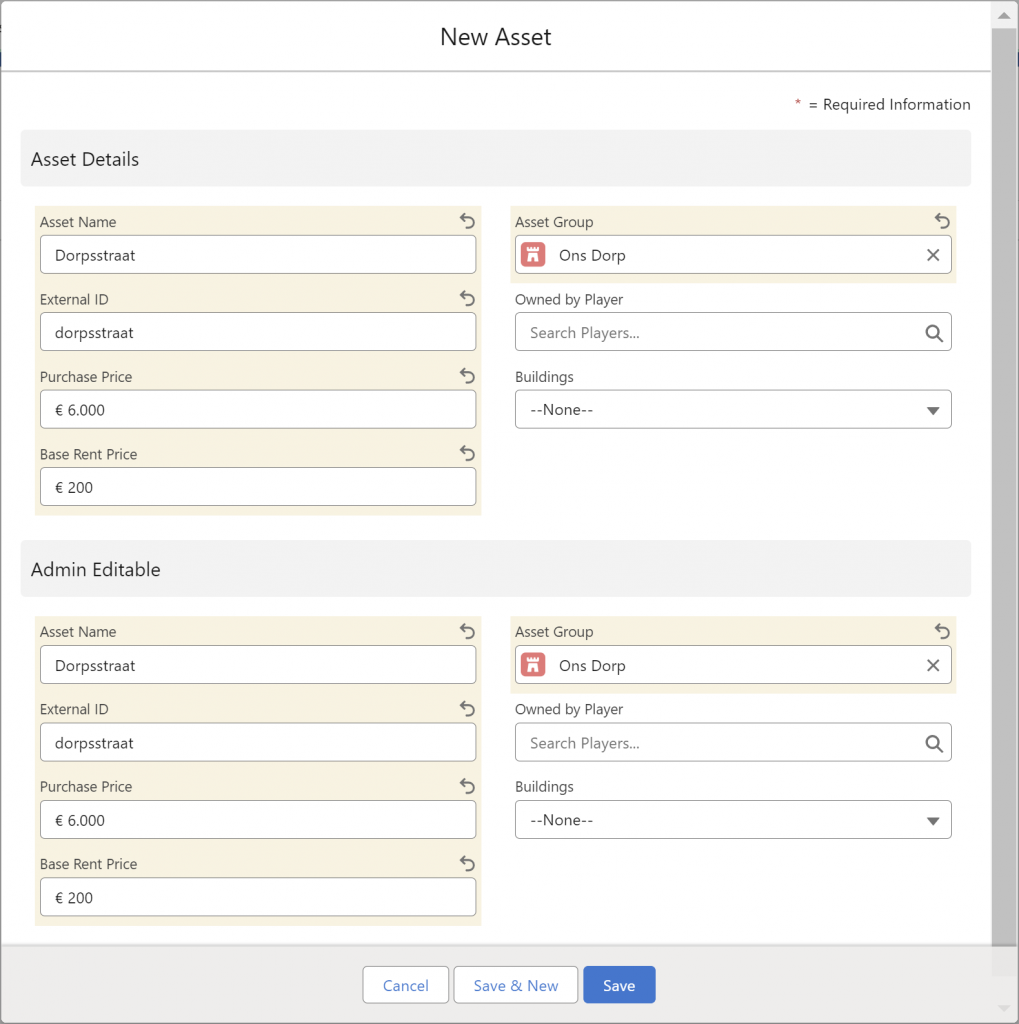
First, we create one Asset manually. This will be the first Asset for the board: Dorpsstraat – Ons Dorp.
- Name: Dorpsstraat
- External Id: dorpsstraat
- Asset Group: Ons Dorp
- Purchase price: 6000
- Base Rent Price: 200
Build your import file using an export
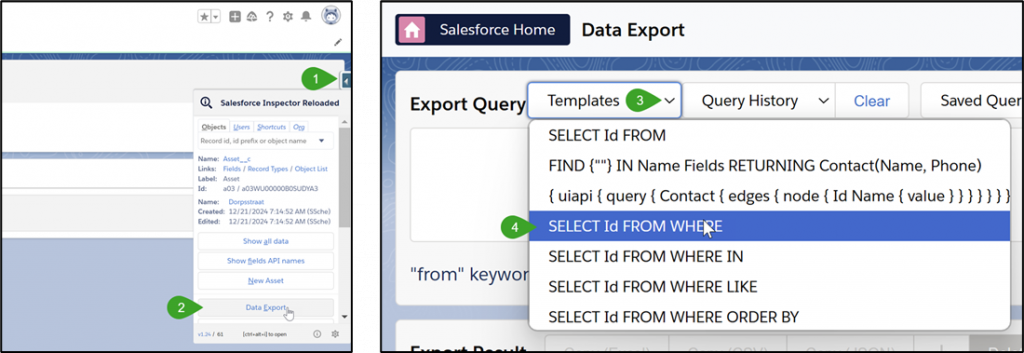
Now that we have one record of this object, we can create an export that will serve as the basis for our import file. Open the Salesforce Inspector Reloaded browser extension and click the Data Export button's custom label.
In this export, you use SOQL queries, which stands for Salesforce Object Query Language. A SOQL query always begins with SELECT. After this, you list the fields to include in the export, separated by commas. Next, you specify the object you want to export from using FROM. After that, you can use WHERE followed by your filter criteria. For this export, we don’t need filter criteria, but I will include a filter in the query to provide an example of how to write one.
Finally, I will explain how we establish the relationship between our imported Assets and their Parent records. You can simply use the field API name of the lookup or master-detail relationship. The value you need to provide is the 18-character Salesforce record ID of the Parent record. However, we can make it easier for ourselves by using the Parent's External ID, which we defined ourselves. This ID is more readable and much easier to remember.
Here is what the query looks like to export the existing Asset:
SELECT Name, External_Id__c, Asset_Group__r.External_Id__c, Purchase_Price__c, Base_Rent_Price__c FROM Asset__c WHERE CreatedDate >= TODAY and External_Id__c != nullTo make things easier for yourself, start with a query template: SELECT FROM Object WHERE The second step is to choose the object. Select the object in your query by starting to type the name of the object you want to export. Note that we are working with the custom object. Asset__c , not the standard object Asset.
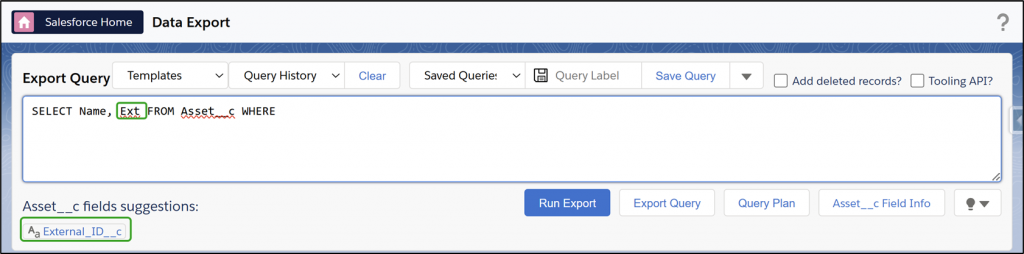
Now place your cursor between SELECT and FROM and start typing the field names you need. You should notice that, as you type, the list of options below the input field updates to match your input. This allows you to click on the options instead of typing out each field name in full. Be mindful of the commas between the different fields.
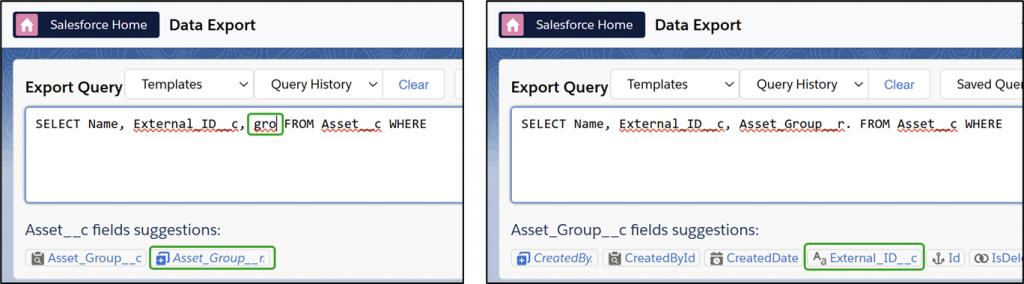
For the relationship to the parent Asset Group, we do not use the field Asset_Group__c but the italic Asset_Group__r. If you do this, you can then select fields from the Asset Group object.
Finished with your query? Then click the Export button. The result will be ready immediately, but if you're exporting a large amount of data, it will be processed in chunks of 2,000 records at a time. Wait until the entire export is complete. After that, click Copy (Excel).
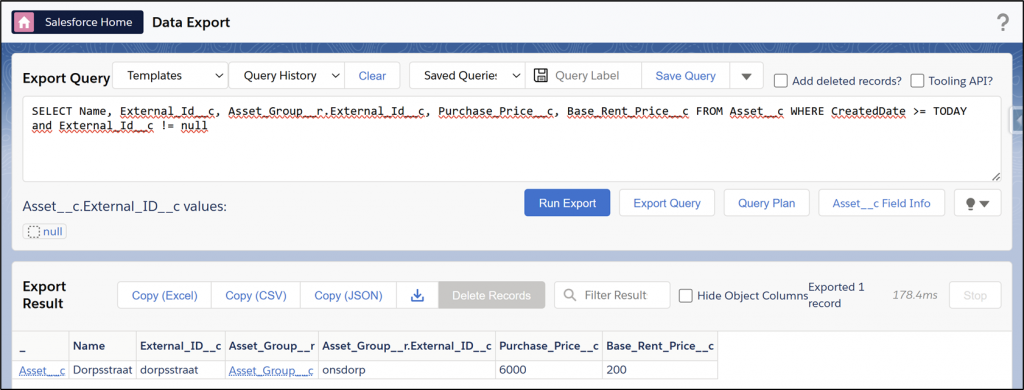
Open Excel, place your cursor in cell A1, and press Ctrl+V to paste the exported data. This is a convenient way to create an import file, as column A will help Salesforce Inspector Reloaded understand which object to import to, and the column headers will automatically map the data to the correct fields.
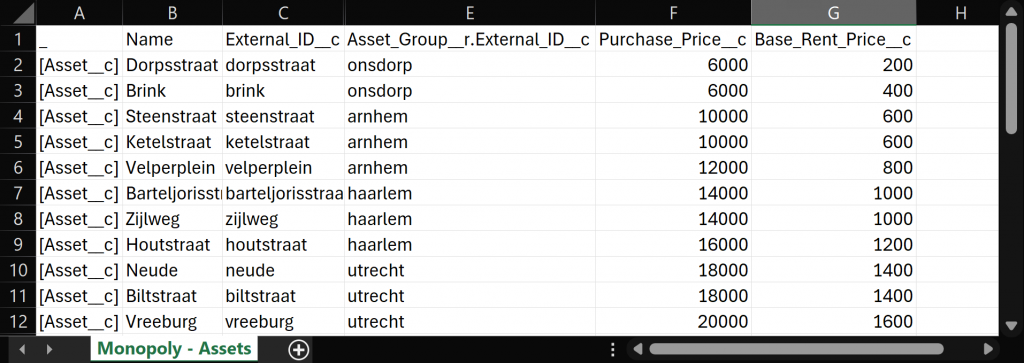
At the bottom of this article, you can download the import file that I have completed further.
Importing Assets
- Reopen the Salesforce Inspector Reloaded browser extension.
- Click Import Data
- In Excel, copy all the columns and rows that contain data.
Ctrl+C- Paste this data into the Data input field in Inspector.
Since we already have the correct column headers, the data you pasted will automatically be mapped correctly. For this import, you only need to adjust the following settings:
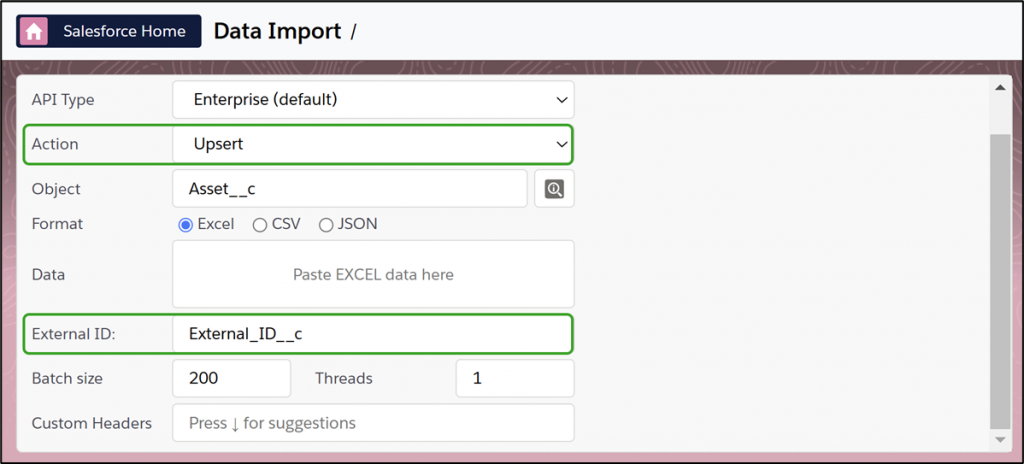
Now we can click the Run Upsert button.
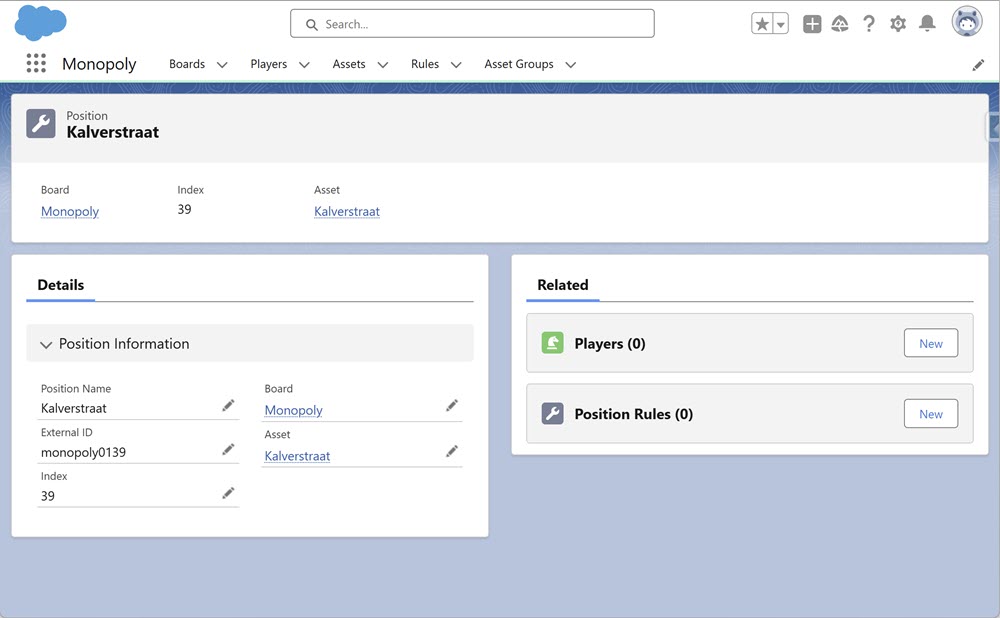
Positions
Now that the Assets are created, we can proceed with importing the Positions. Since Positions have lookup relationships to the Board and often to an Asset, it was useful to create those two first.
The steps for importing Positions are the same as those for importing Assets. After this, we will also import the Asset Price Rules and, for testing purposes, manually create two players.
At the bottom of this article, you will find the Excel file containing all the data we need to import.
Rules and Position Rules
Rules require more attention, so in several of the upcoming blogs, we will focus on creating and refining the Rules.
I will create a few of them now that are always linked only to one specific field.
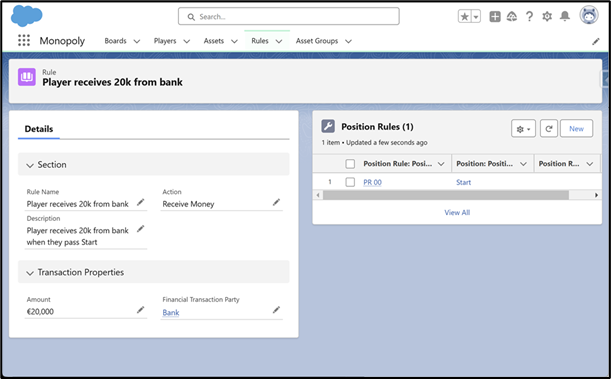
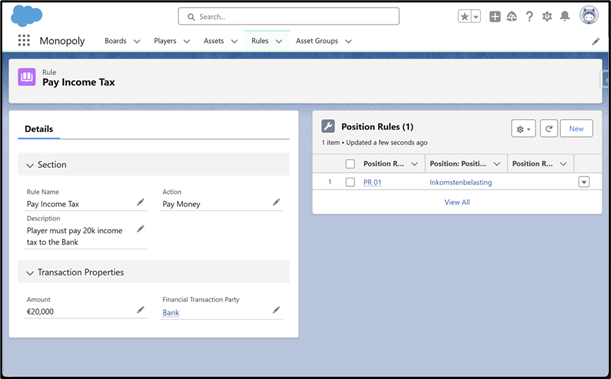
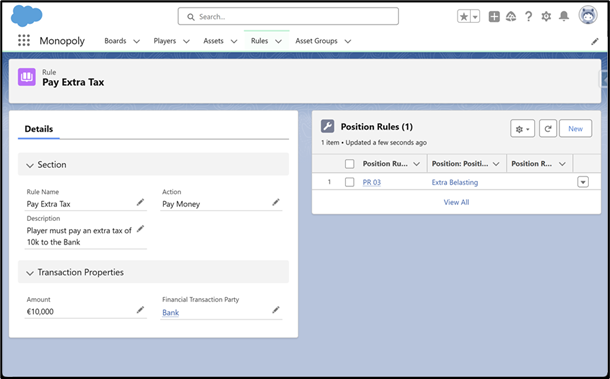
- Go: Player receives € 20,000
- Income Tax
- Super Tax
- Go to Jail
We will create these via the Rules tab and link them to the appropriate Positions through the Position Rules Related List.

Asset Rent Rules
The final object for which we will import data now is the Asset Rent Rules. If we compare our objects to the physical components found in a Monopoly game box, the Assets represent the property deed cards, while the Asset Rent Rules are the pricing lines for the rent on these properties.
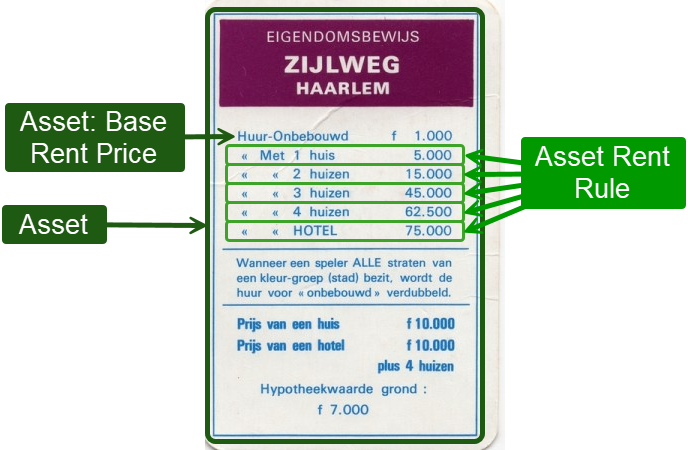
Yes, I really looked at the version I played as a child, which might even be older than I am. I like the amounts that are 100 times higher better than those in the version I currently have at home. :)
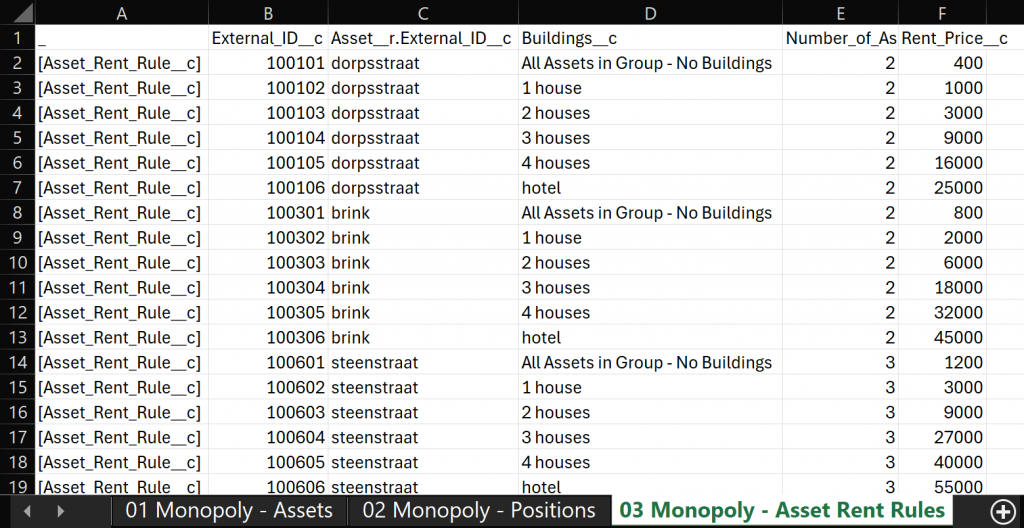
You can also find these in the Excel file shared below.
Throughout the upcoming episodes, we will occasionally make adjustments to the data model and page layouts as new insights arise. Additionally, we will add more data later, such as additional Rules.
In the next part of the series, we will begin exploring how a player's turn unfolds and delve into Flow Builder.