

If you read the previous episode, you might think we're about to build a very simple flow. We know who owns the asset and the rent that can be charged, so the payment can be processed entirely automatically.
However, we're going to make it a bit more interesting. When you play Monopoly in real life, you also need to pay close attention.
If we were setting up an app for a real business process, it would actually be desirable to fully automate those human steps that introduce the risk of errors or delays. But we're working on a board game and a creative challenge where we want to use as many Salesforce techniques as possible.
What I want is for the landlord to pay attention in order to actually receive the money. Getting rich while doing nothing? No way!
But how do we handle that? In the real game, the landlord gets a moment to claim the rent, but if they’re not paying attention and the next player rolls the dice, the opportunity to collect rent is lost. However, in a Screen Flow, there’s no Wait element available. If the active player wants to click through quickly, they can. Additionally, the other players aren’t looking at your screen, so seeing what happens to another player in real time is also challenging.
The solution we’re going to implement is a 'conditional payment.' The active player proceeds with the payment, but if the landlord doesn’t respond quickly enough, the transaction is canceled, and the tenant gets the conditionally paid amount back.
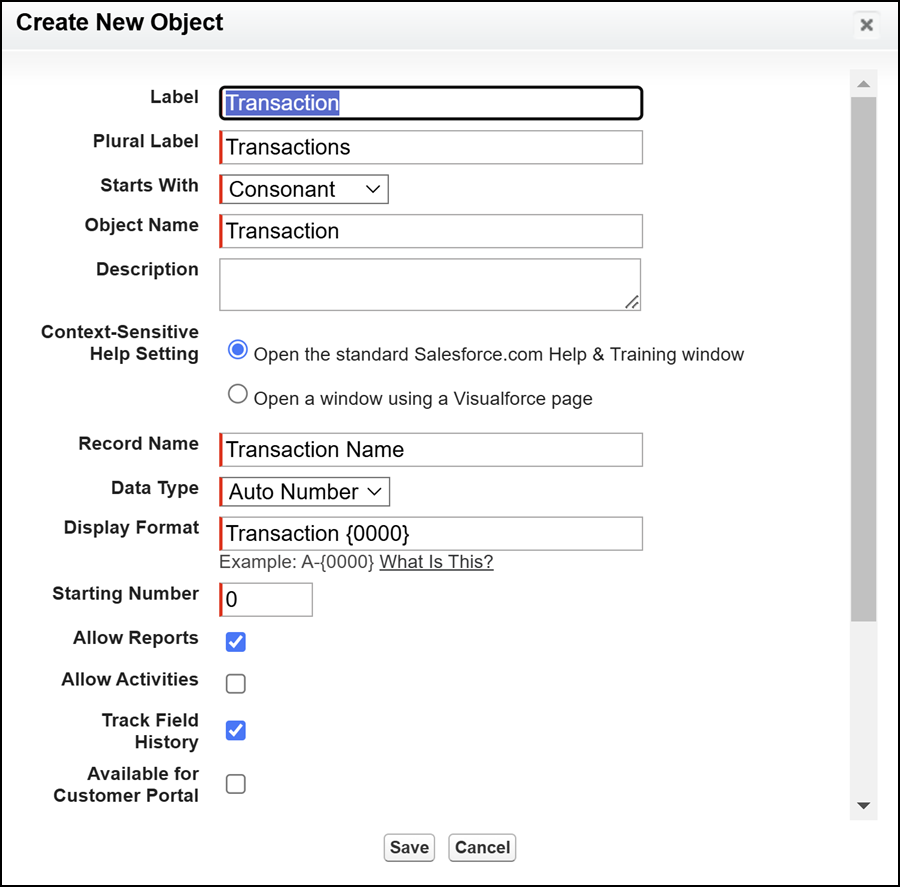
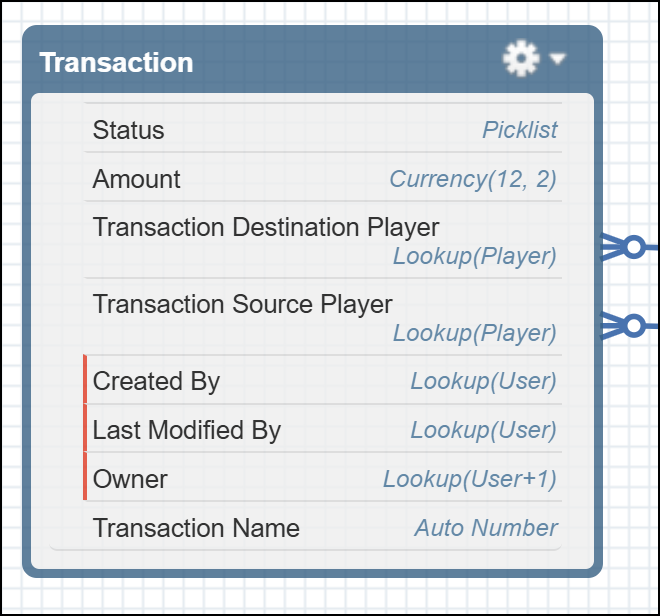
Step 1: A New Object – Transaction
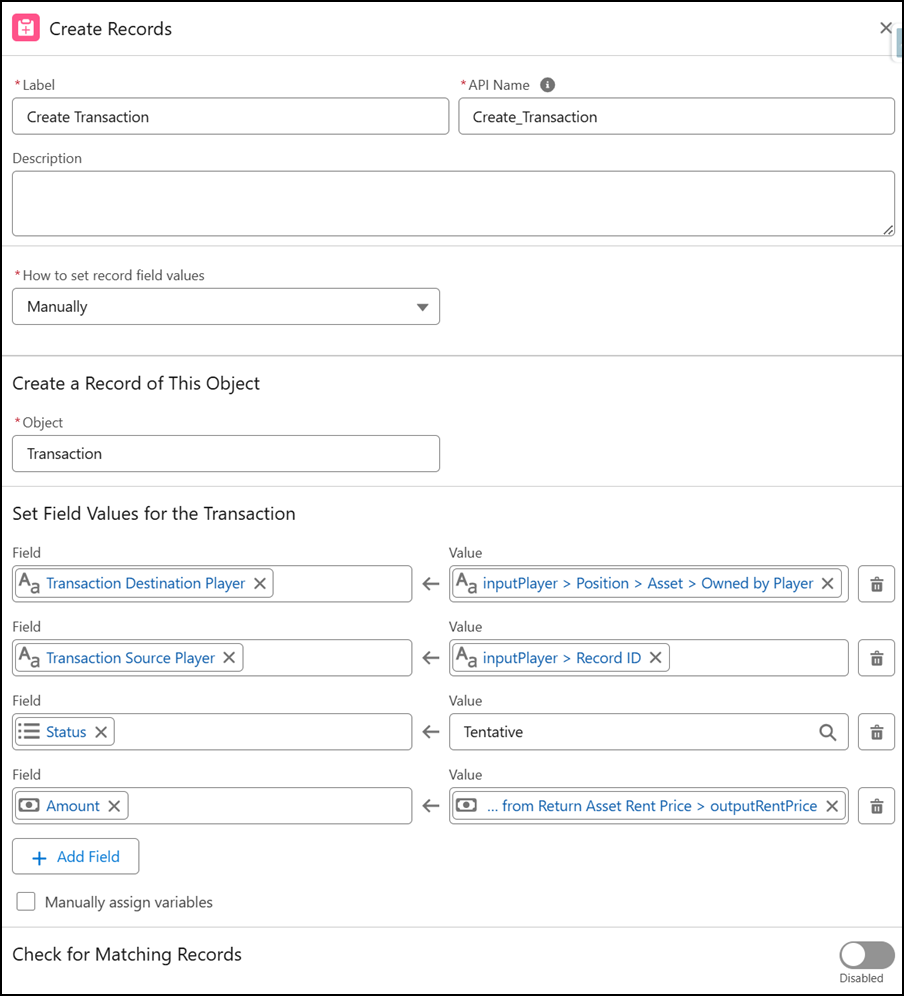
To achieve this, we’re introducing a new object to record the transaction. This object should include the amount, the paying player, and the receiving player. Additionally, we need a way to indicate whether the payment is tentative or final.
- Amount
- Currency 12,2
- Transaction Source Player
- Lookup Player
- Transaction Destination Player
- Lookup Player
- Status
- Picklist met de volgende waarden
- Tentative
- Confirmed
- Canceled
- Picklist met de volgende waarden
The Process in Brief
When a player lands on a property owned by another player, the following will happen:
- The correct rent amount is calculated.
- A Transaction is made with its status set to Tentative
- A Custom Notifitation is sent to the Player who owns the Asser
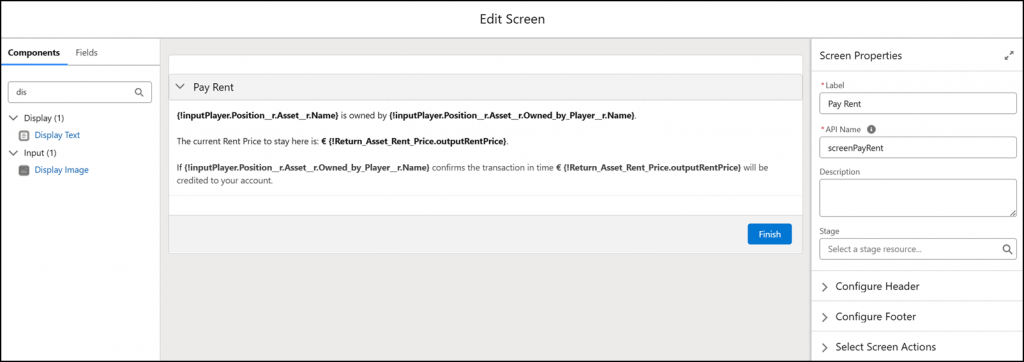
- The active player sees a screen displaying who owns the asset and the rent amount to be paid.
For the active player, the interaction ends here. By clicking the Next/Finish button, their turn ends. Now the landlord must get to work.
- The notification must alert this player to the transaction
- The landlord opens the Transaction's record page
- For this player, the page is mostly Read-Only.
- The only interaction option is the Confirm quick action in the Highlights Panel
- This button is conditionally visible:
- Only when the player viewing the page is the Transaction Destination Player
- And only when the Status of the Transaction is Tentative .
The receiving player has a limited time to confirm the Transaction. Therefore, we will set up a record-triggered flow that updates a Transaction to Canceled if it has not been Confirmed within a certain number of minutes.
Finally, the paying player must be informed whether the transaction has been finalized or not. We will post this update on that player's Chatter feed.
Step 2: Preparations
Before we can continue building the Screen Flow for the active player, we need to take care of a few things.
- A Custom Notification Type needs to me made
- A flow needs to be built, that calculates the correct rent price for an Asset
- Adding a User lookup to the Player object
- Making the Confirm action for the Transaction object
- Properly set up the Lightning Page
- Making the record triggered flow that updates a Transaction to Canceled if it has not been Confirmed within 2 minutes
- Making the record triggered flow that posts on the Chatter feed of the paying player whether the payment has been finalized or not.
Custom Notification Type
Custom Notifications are notifications that Salesforce users can receive. If you have any unread notifications, you will see this in the top right corner of your screen.

You can send these from a flow, but to be able to do so, you must first create a Custom Notification Type .
In the Setup menu bar on the left hand side of your screen, search for Notification, click Custom Notifications and click the New button.

We shall give it a name, choose where we should be able to use it and click Save.

Calculating the rent price
In most cases we only need to find the rent price in the right Asset Rent Rule of the Asset. Rent for the utilities also depends on the number of steps the player has moved to end up there, so for that scenario we do need to make a calculation.
We will create a new Autolaunched Flow named ALF – Return Asset Rent Price.
Here, we start by retrieving the other assets from the same asset group that are also owned by the same player. The number of assets owned from this group is one of the attributes we want to use to find the correct asset rent rule.
In the main flow, we don’t have direct access to the Asset as a record variable. We could use a Get Records element to retrieve the Asset based on its Id, but if we pass the inputPlayer variable from the main flow to this subflow, then through the Position lookup and its related Asset lookup, we do have access to all the Asset’s field values—such as Id, Buildings, Owned by Player and Asset Group.

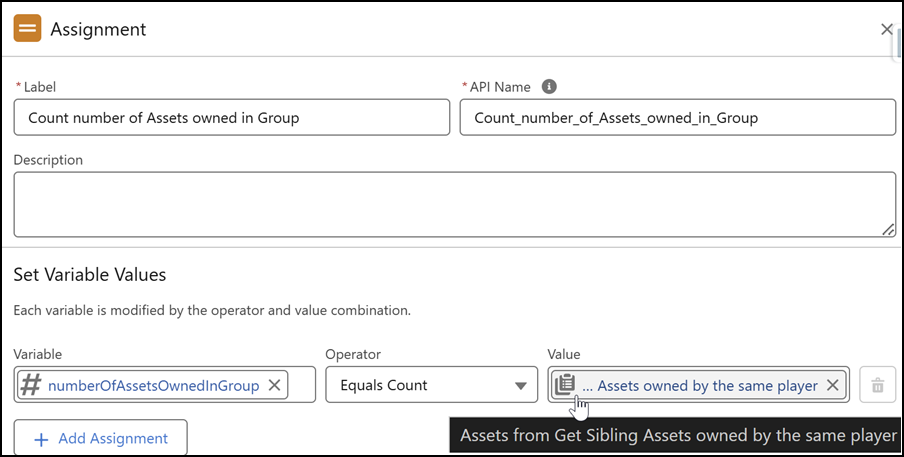
Next, we use an Assignment to count how many assets were found that meet these criteria. Tip: if you're creating a number variable to use for counting—whether within a flow or for a Number field on an object—make sure to set the default value to 0. This helps prevent unexpected results when using conditions like greater than or less than in decision elements.
Now we have everything we need to find exactly the right Asset Rent Rule .
Although the intention is that these filters should only return a single result, it's usually still possible for multiple matches to occur. An app administrator or someone with permission to create or edit Asset Rent Rules could always make a mistake. To ensure we can still predict and verify which record will be used among the matching results, I often sort the Get Records element—when retrieving just one record—so that the most recently modified record is selected.
The Asset Rent Rules we’ve created don’t include the base rent prices. So ideally, our flow should also have a fallback plan that uses the Asset’s Base Rent Price if no Asset Rent Rule is found that meets the criteria. The simpler approach would be to go ahead and create Asset Rent Rules for the base rent of each Asset. Note: for cities with three streets, we’ll need two Asset Rent Rules that both result in the Base Rent Price.

With this Excel file and Salesforce Inspector Reloaded, you can import the additional Asset Rent Rules.
The final step is to pass the Rent Price we found from this flow back to the parent flow. We do this by assigning the value from the found Asset Rent Rule to a variable that is marked as available for output.

Rent Price times number of steps
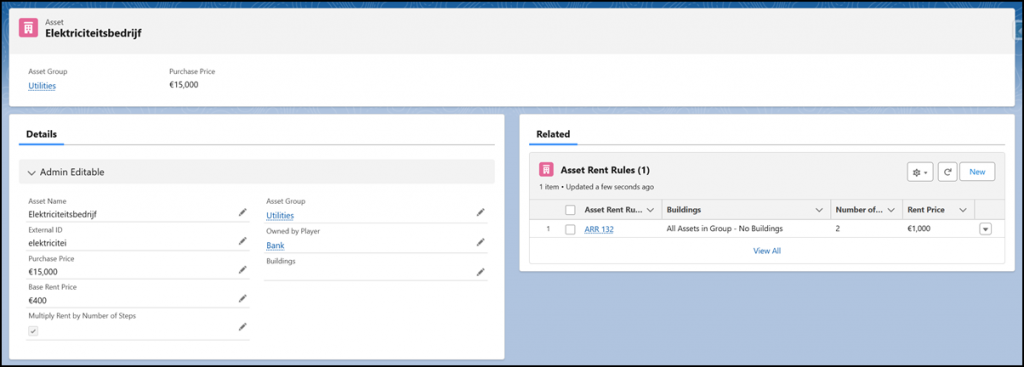
Specifically for the utilities, we'll add an extra branch in the flow. The outcome of the decision determines whether the retrieved rent amount needs to be multiplied by the user's roll value. The value checked in this decision shouldn’t be hard-coded into the flow, so the information needed to make this decision should be stored in data or custom metadata.
The simplest approach, in my opinion, is to introduce a new checkbox on the Asset object: Multiply_Rent_Price_by_Number_of_Steps__c. We only need to check this box for the Electric Company and the Water Works .
Additionally, we need to pass the number of steps the active player has taken into this subflow. To avoid creating an extra variable for this, we’ll create a dedicated field on the Player object to store the value of the player’s most recent roll. We’ll also need to make sure that the SCR – Roll and Move flow saves the roll value to the Player record.

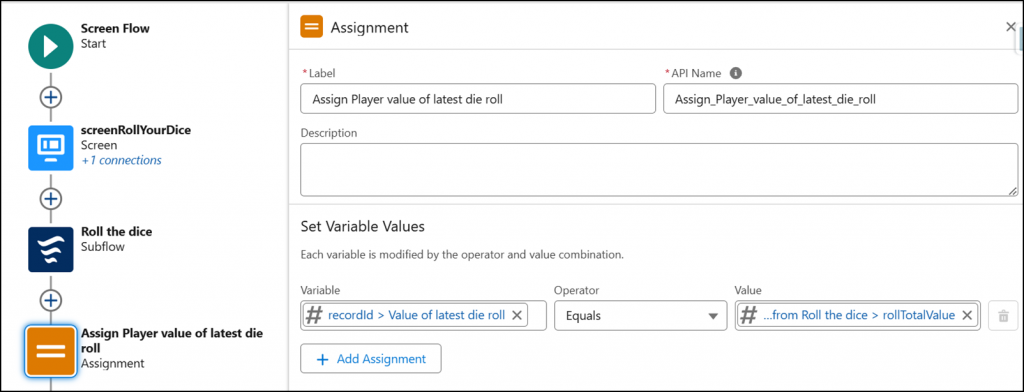
Now we can add the extra Decision to the ALF – Return Asset Rent Price flow.

To assign the price for one of the utility companies, we need a formula that we can then use in the Assignment.

While on the decision branch where no multiplication is needed we simply assign the Rent Price from the identified Asset Rent Rule, on the other branch of this Decision we use the following formula.

Confirm Action
This Action is one of the simpler features, but all the more important for an admin to master.
An Action can be seen as a kind of mini page layout, designed to make a specific record update very easy for users.
- You only show the fields that are relevant to the update the user needs to make
- You can prefill the new values of the fields to be updated for the user
- You can also prefill fields that aren't shown to the user—for example, with a specific status value or today's date
This allows the end user to work more efficiently and reduces the chance of errors.
An Action can be made much less time than a Screen Flow and is more simple.
We go to the Object Manager in Setup and search for the Transaction object.

The layout looks as follows.
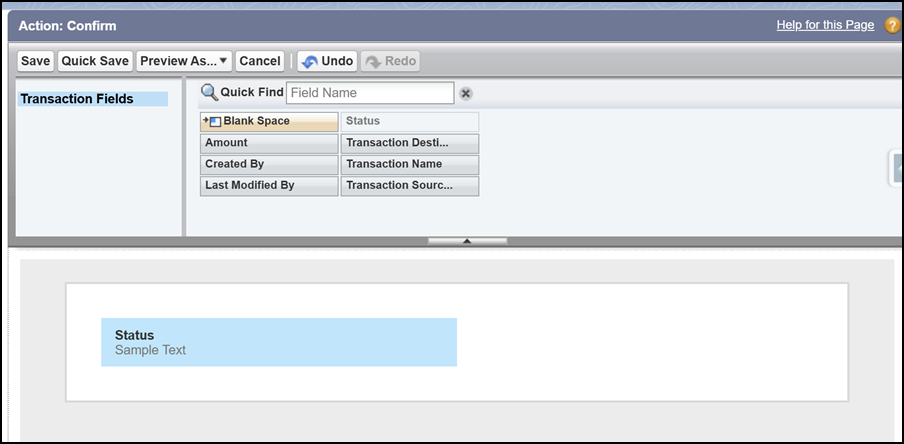
The only value we need to prefill is Status = Confirmed.

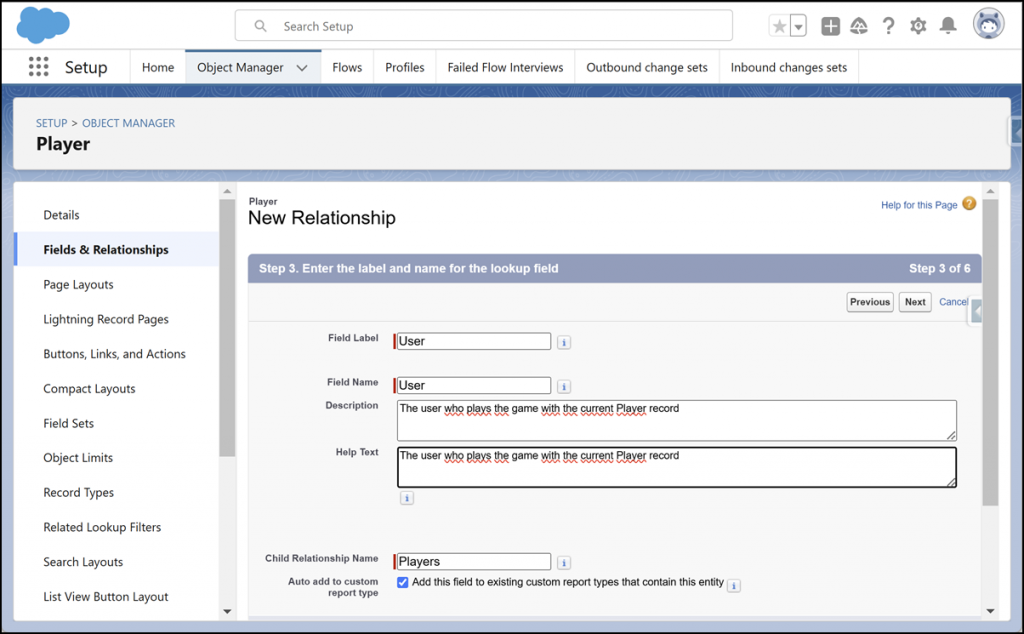
User lookup on Player
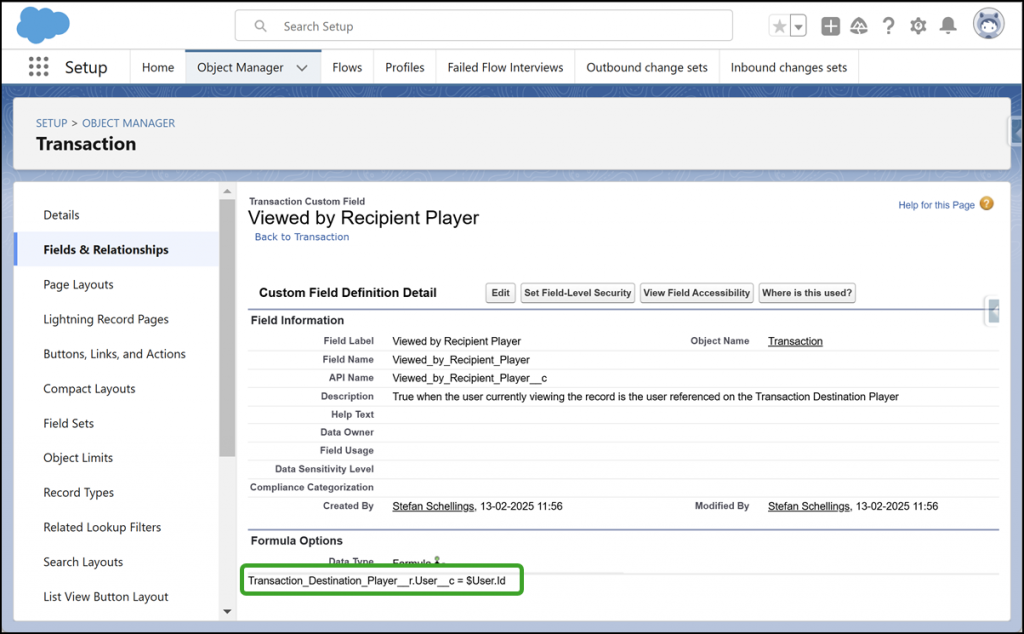
For the visibility of this button on the Lightning Page, one of the conditions is that the user viewing the page is the receiving player.
To determine that, we need a field on the Player record that indicates which User ID is associated with that player.
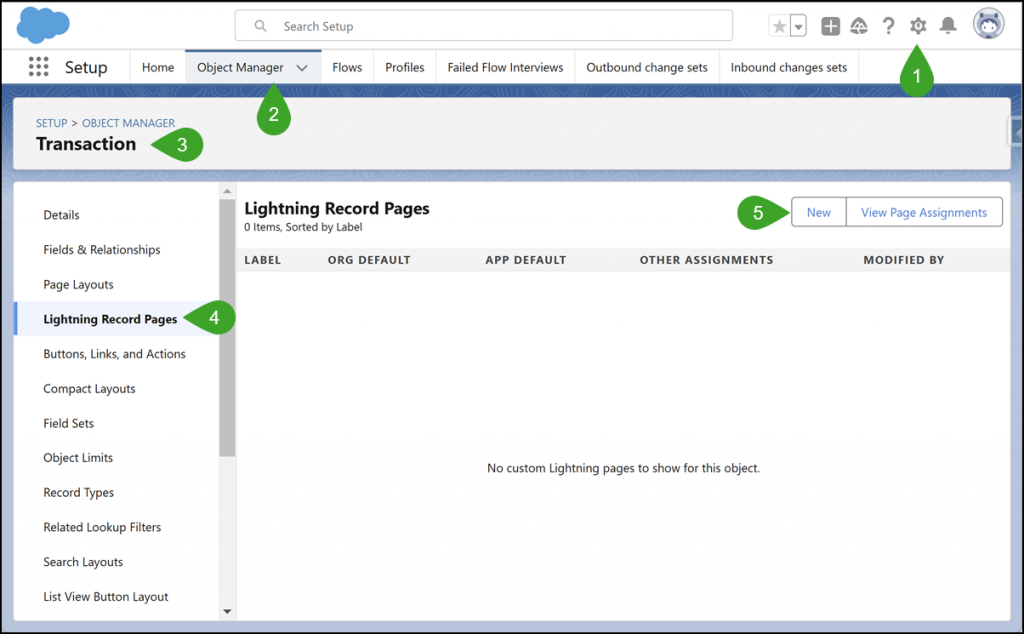
Transaction Lightning Page
In part 2, you already saw how we can make Field Sections conditionally visible on a Lightning Page. You can do the same thing with Actions in the Highlights Panel.
The ability to set individual visibility conditions for each component on a Lightning Page makes this approach much more user-friendly than having multiple record types and managing a full Page Layout for each one.
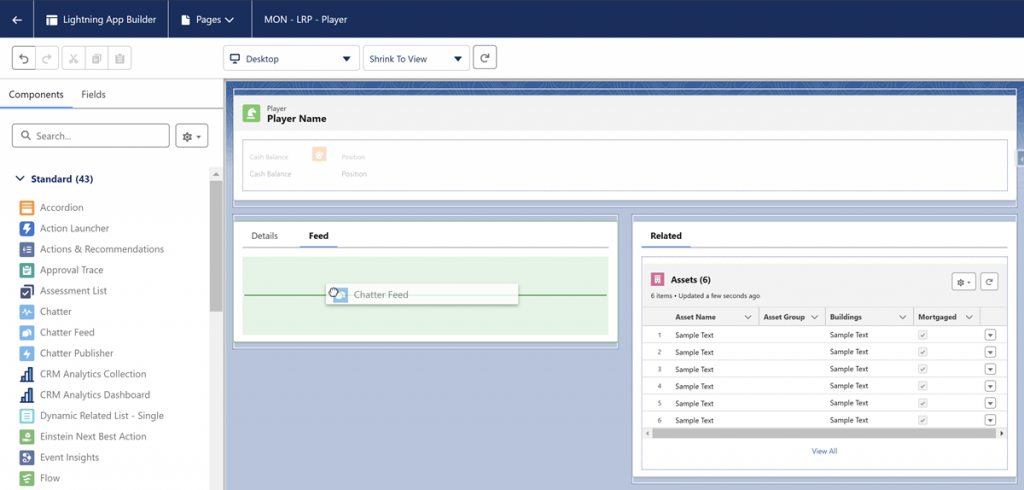
To get started, we go to the Lightning App Builder for the Transaction object and create a new Lightning Page.

We're starting from scratch now. First, we drag a Dynamic Highlights Panel onto the page.
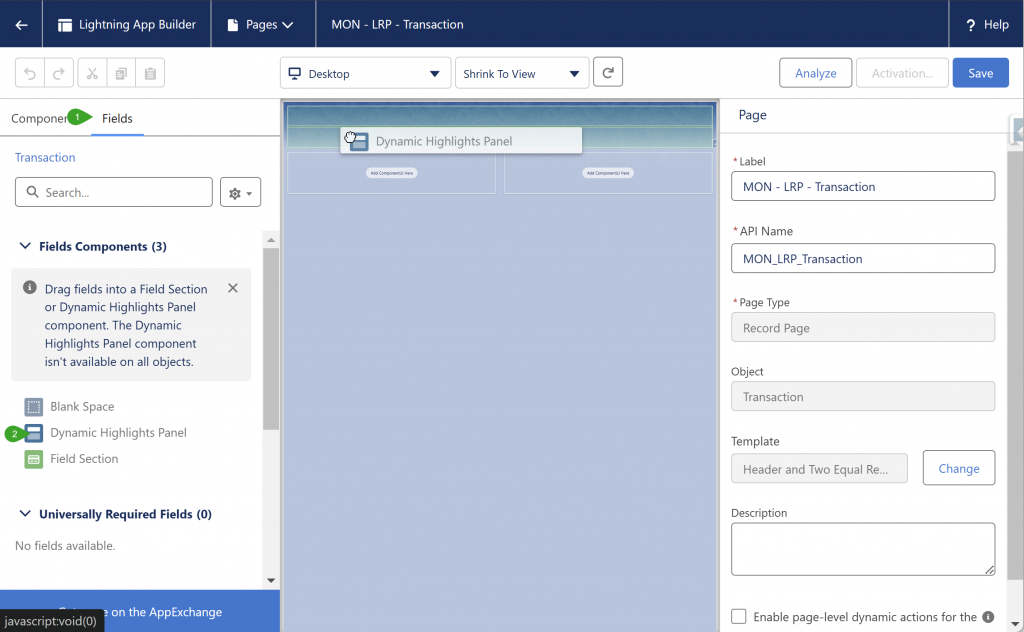
Into it, we drag the fields Transaction Source Player and Amount. By placing them on the Highlights Panel, they are automatically read-only.
We also place the Action Buttons we need in the Highlights Panel.
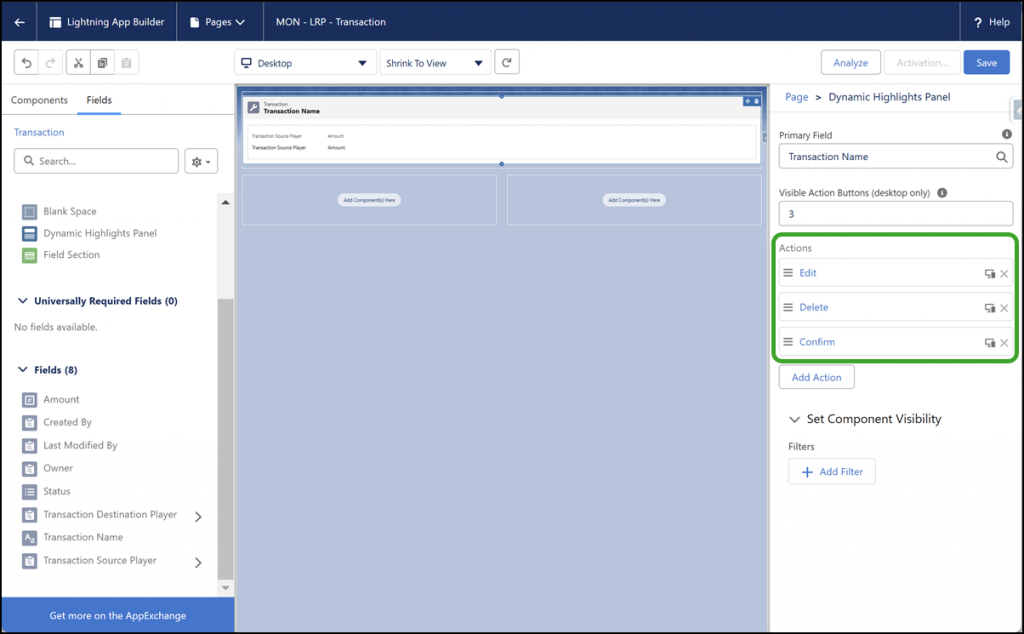
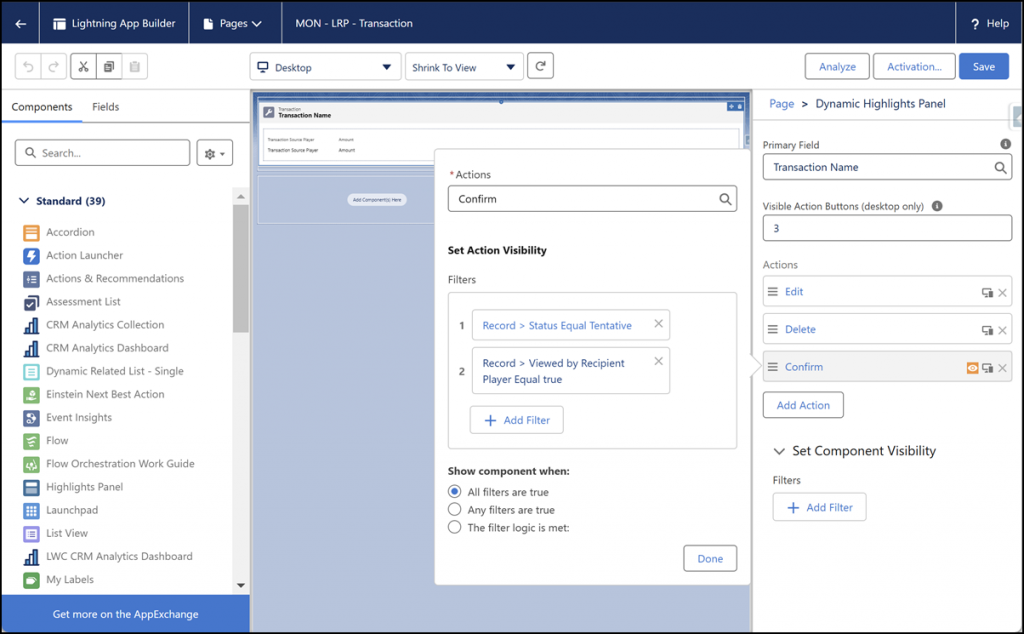
The custom Confirm action can be made conditionally visible on the page in the same way as other components. The following two conditions must be met for this button to be shown:
- Status = Tentative
- $User.Id= $Record.Transaction_Destination_Player__r.User__c
It turns out that’s not possible. For conditional visibility, you can’t compare one field value to another—only to a hard-coded expected value. So instead, we need to build a formula and use that in the filter.
We add another Field Section that should only be editable for the Admin, so we can create test records to test the conditionally visible button. We also need to create a custom tab for this object, since that doesn't happen automatically when you create a new object using Schema Builder, as we did.
To test the visibility, we first need to link our own user to the Player we'll be using for testing.

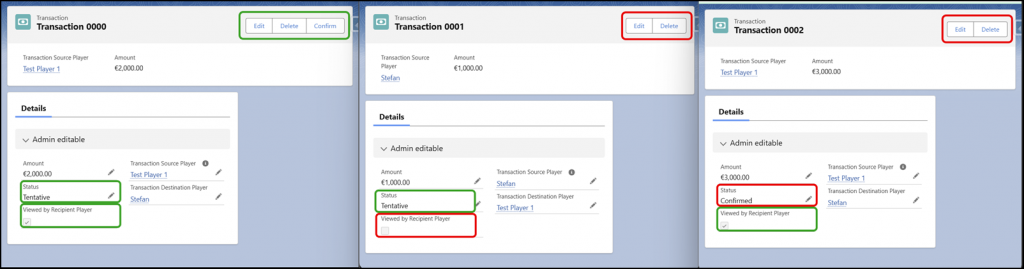
Now that we have the editable section on the page and a tab, we can go to the Transactions tab via the App Launcher and create a few records. Below, you can see how I tested whether the conditional visibility works as intended.
Cancel Transaction flow
To give the receiving player only 2 minutes to confirm, we create a flow that updates the Transaction to Canceled if it’s still Tentative two minutes after it was created.
For this, we configure the flow to trigger only when the record is newly created and the Status is Tentative.
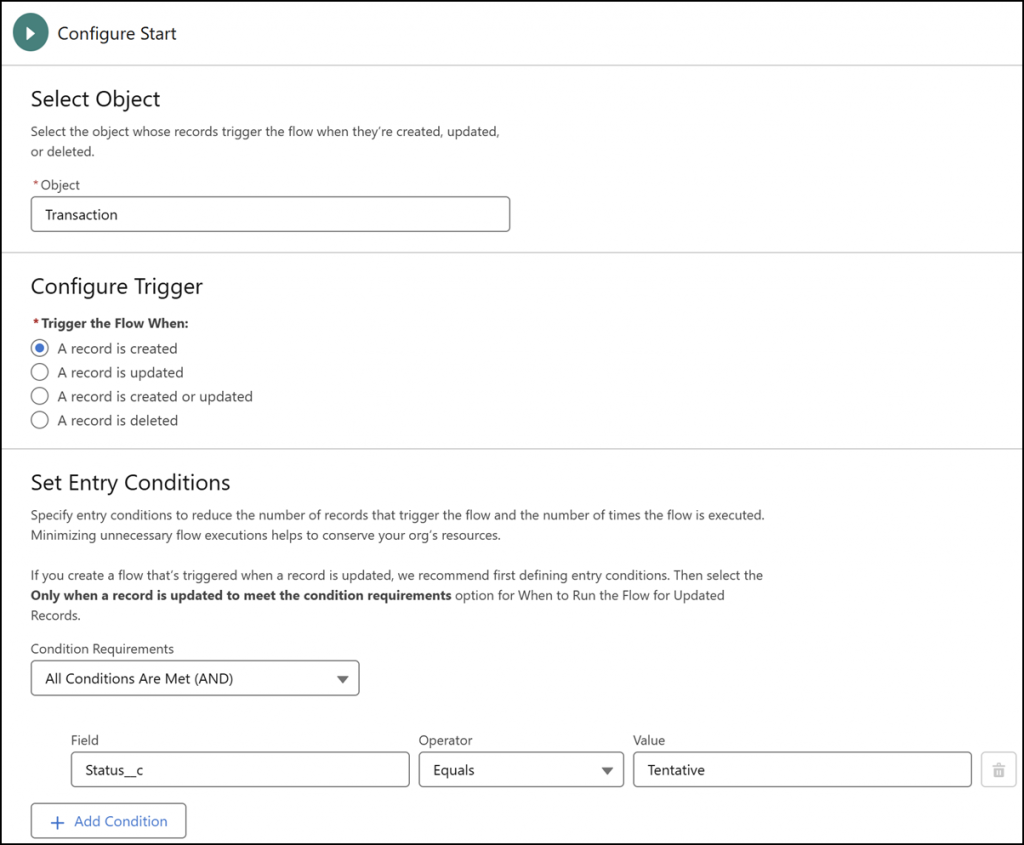
We don’t place anything under the “run immediately” path, but instead add a path with a 2-minute delay.

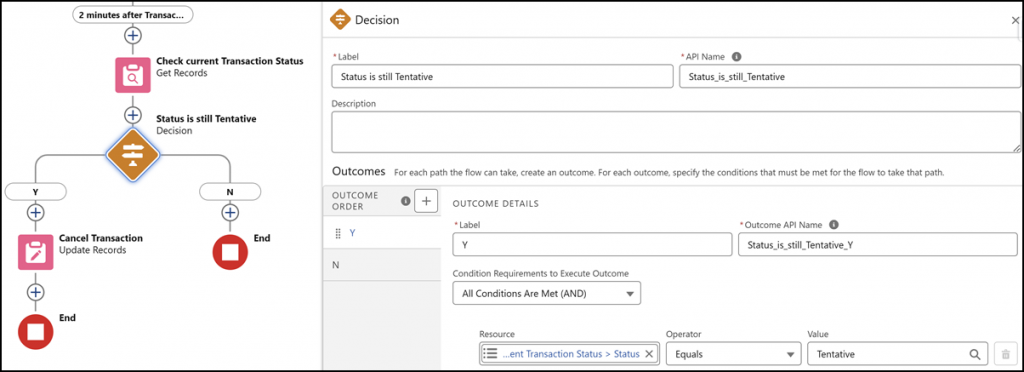
After 2 minutes, we check whether the Transaction for which the flow interview was started still has the status Tentative. To do this, we need to retrieve the same record again using a Get Records element. If you don’t do this, the flow will refer to the field values as they were when the flow interview began, and won’t be aware of any changes made to the record since then.

Next comes a Decision where we check whether the current status of the Transaction is still Tentative. Only if that is indeed the case do we update the status to Canceled. Note that we do not use the $Record variable for this check.
The test
To test the flow's functionality, we create three Transactions.
- We create one with the status already set to Confirmed at the time of creation. In this case, the flow should not be triggered.
- The next one we create with its Status set to Tentative, but then immediately update it to Confirmed. In this case, the flow is triggered, but no update occurs.
- The third one we create as Tentative, and we don’t take any further action on it. In this case, the status should be automatically updated.
For this test, we also need to prepare the following:
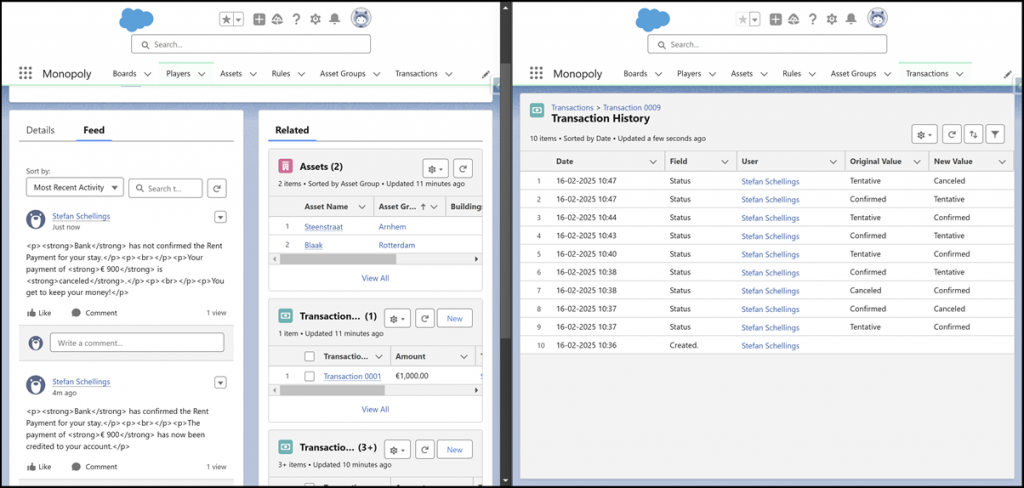
- Specify on the Transaction object that field history tracking should be enabled for the Status field
- Add the Related List Transaction History to both the Page Layout and the Lightning Page
In the screenshots below, you can see that I updated Transaction 6 at 9:46 to show that no automatic update occurred after 2 minutes. For Transaction 7, you can also see this, and the Transaction History shows that I manually changed the status to Confirmed immediately after creating it. In the case of Transaction 8, the Transaction History shows that the status was updated at 9:45—that update was performed by the flow.
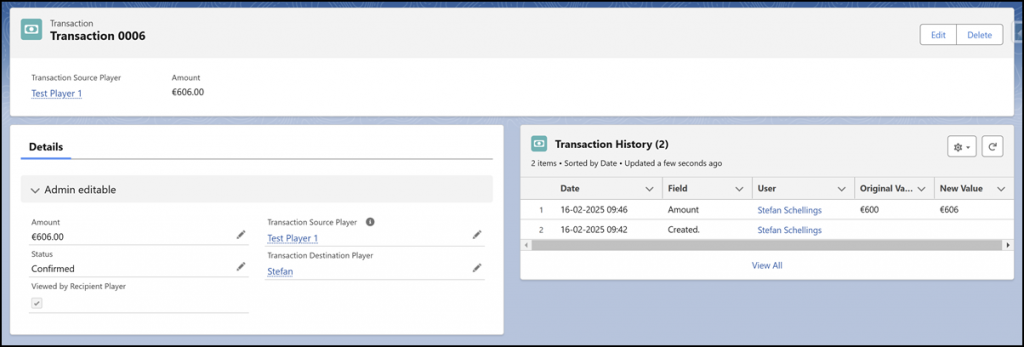
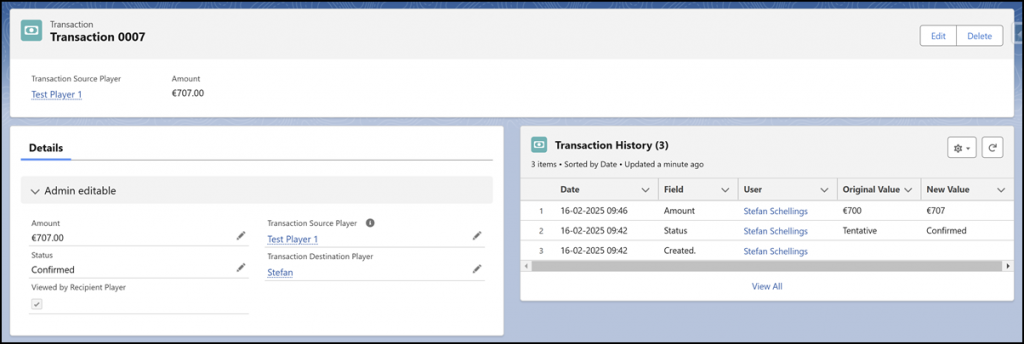

So this part of the functionality also looks good.
Post to chatter flow
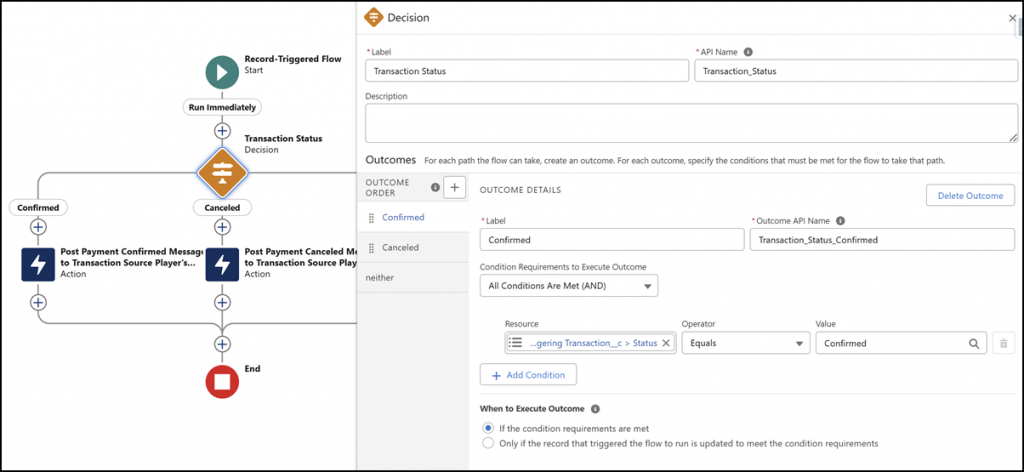
For this as well, we create a Record-Triggered Flow. It should be triggered as soon as the status of a Transaction is updated to either Confirmed or Canceled.
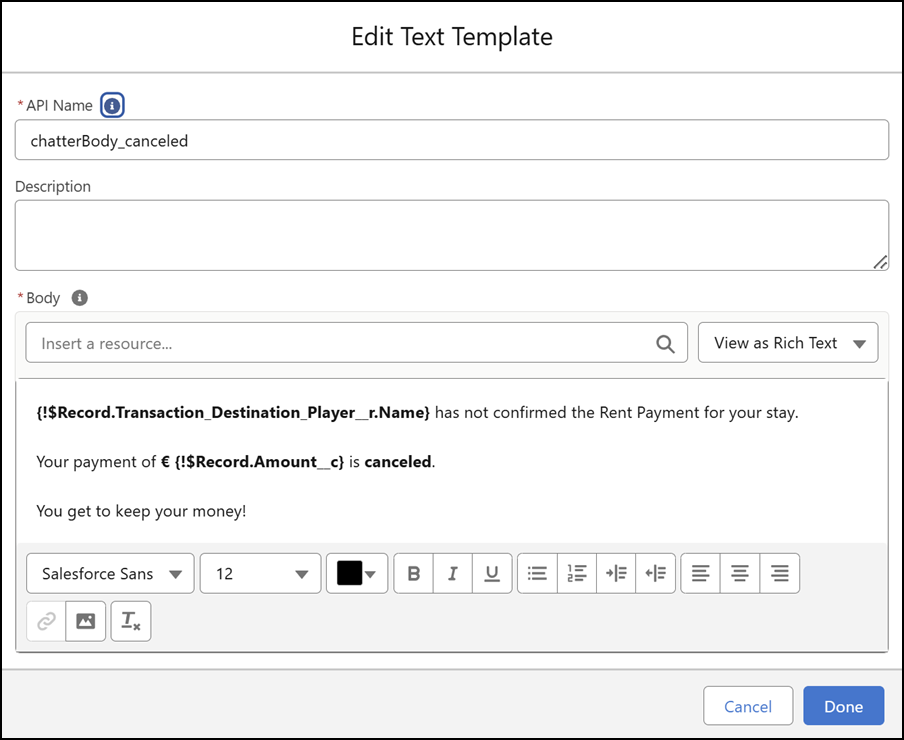
Next, we create two different Text Templates that can be used in the Chatter posts.

We use a Decision to create separate paths for both options, and then place a Post to Chatter action in each path.


The test
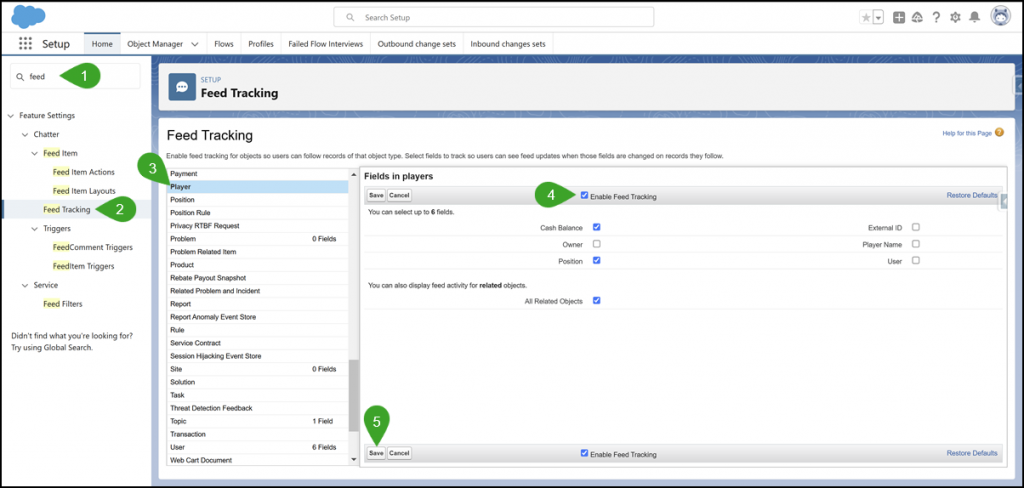
To test this, we need to enable Feed Tracking for the Player object and add the Chatter component to the Player Lightning Page.
We take this opportunity to also add Dynamic Related List components for the related lists Transactions Received and Transactions Paid to the page.
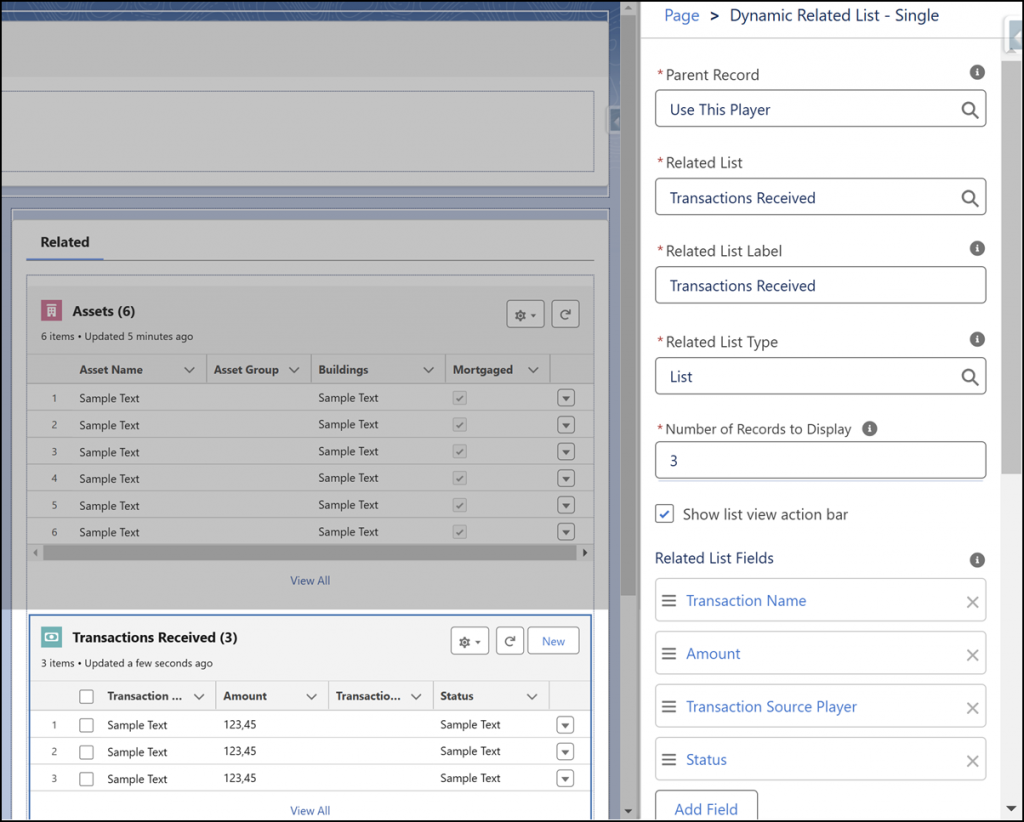
Now I can start testing with a Transaction record. As we can see in the screenshot below, it does work—but the post appears as plain text, showing all the HTML tags for the bold text.
UnofficialSF to the rescue
I’ll go into more detail about this in a future blog post, but for now I’ll keep it brief. UnofficialSF is a website where you can find very useful custom Screen Components and Flow Actions that you can install in your Salesforce org. I know they have a handy Action that lets you post to Chatter from a flow with working rich text formatting.
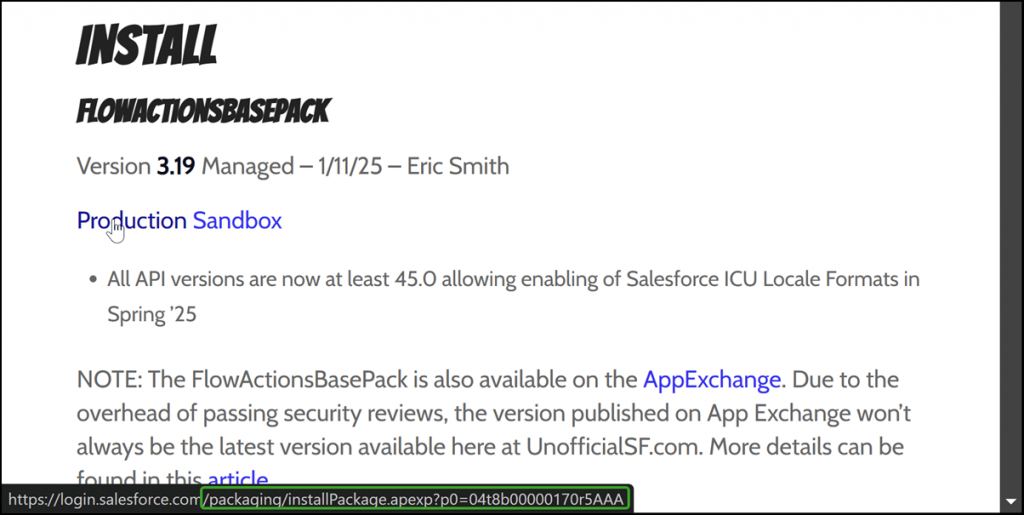
To install that, we also need to install the Screen Components and Flow Actions base packs. You can find those base packs and their installation links here..
The easiest way is to copy the download link. You don’t need the https://login.salesforce.com part. Open a new tab in the org you’re building in, delete everything after your main domain in the address bar, and paste the copied link there—making sure to only use the part starting from /packaging.


We repeat this process for the Screen Components Base Pack, and once both base packs are successfully installed, we do the same for Post Rich Chatter.

Now, we replace the standard Post to Chatter actions in the flow with the Post Rich Chatter actions.

And in the new test, the feed posts look like this. I did have to clean up the HTML tags in the Text Templates to get the formatting right.

Oh right, not unimportant: when the Transaction moves to Confirmed, the funds must be permanently transferred from the paying player to the receiving player.
For this, we create an Autolaunched Flow called ALF – Execute Confirmed Transaction.
First, let's create two variables:
- inputTransaction
- Type: Record
- Object: Transaction
- updatePlayers
- Type: Record
- Object: Player
- Multiple record: true
First, we retrieve both Player records. Technically, it’s possible to do this with just one Get Records element, but honestly, the added complexity isn’t worth it in this case. After all, we know that this flow will never involve more than two Player records.
Next, we subtract the Transaction Amount from the paying player's Cash Balance, and add that same amount to the receiving player's Cash Balance.
Next, we add both individual Player variables to the `updatePlayers` collection, allowing us to process both updates in a single interaction with the database.
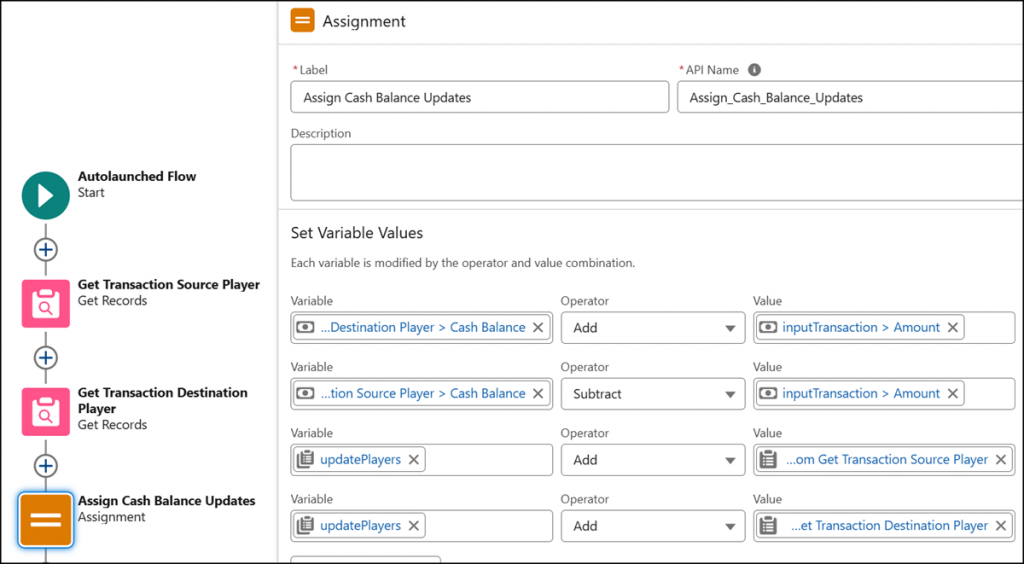

After this update, we use the Lock Record action to ensure that no one can make further changes to this completed transaction.

Finally, we need to embed this flow into the flow that sets a Transaction to Confirmed.

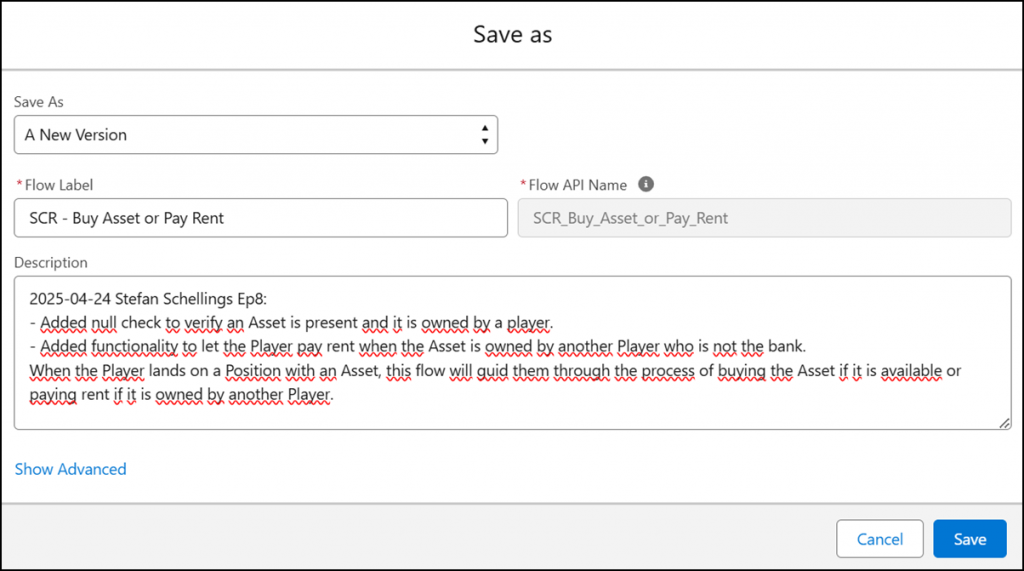
And never forget to note what has changed compared to the previous version when saving a new version of a Flow.

The screen flow for the active player.
Now we return to the flow SCR – Buy Asset or Pay Rent, which we created in the previous part. We continue with the third, currently empty branch of the decision that checks whether the Asset is owned by the Bank or by the active player.

Before we can show the player a screen, we first need to determine the correct rent amount. To do that, we start by adding the ALF – Return Asset Rent Price subflow at this point.

Next, we first create the Transaction record and then display the screen to the user.
Next, we add a check to see whether the Position the Player is currently on actually has an associated Asset. After all, in the subflow where we potentially execute Rules linked to a Position, we handle that check within the subflow as well. The Decision we need to add for this looks like this:
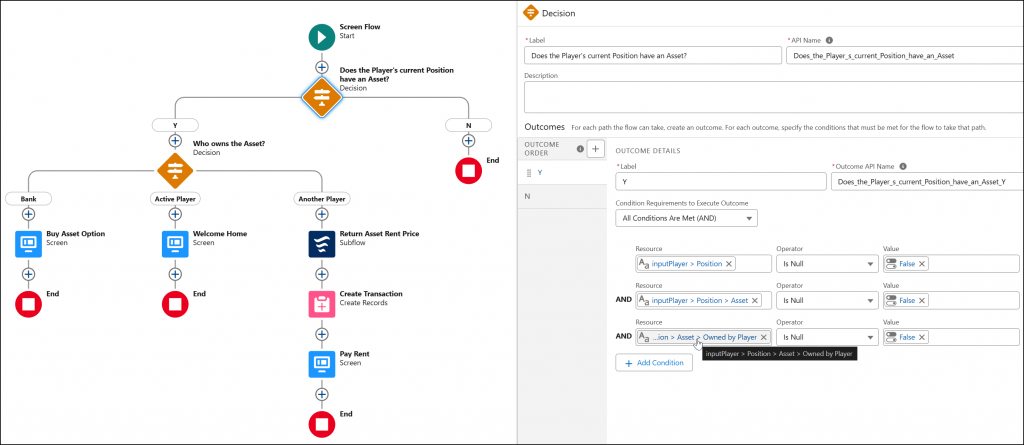
As you can see, at each step in the chain we now check whether the related field in question is not empty. The reasoning is that it makes no sense to ask whether the Position has an Asset if we don’t even know the Position. Since the third path of the Who owns the Asset? decision is the default path, it would also be followed if the Asset’s Owned_by_Player__c value is null—and that won’t work, because it would prevent the correct number of Assets owned in the group from being calculated, and therefore result in no Asset Rent Rule or an incorrect one.
The theoretical scenario where no one owns the Asset at all is therefore handled in that first Decision element.
Document your changes
Now I save the flow with my changes as a new version. When saving a new flow version, it’s important to include in the Description what has changed compared to the previous version. This makes troubleshooting and analysis easier in case of future issues.
In that description, I include the date of the change, my full name—since as an admin or consultant, multiple people might make changes over time using the same user account—and a reference to the case or ticket number where the requested functionality or change was specified and delivered.
Embedding in the Main Flow
The next step is to include the SCR – Buy Asset or Pay Rent flow in the SCR – Roll and Move flow. It should be placed immediately after the SCR – Check for and Execute Position Rule subflow in both locations.

Here too, we save the changes as a new version with a clear and detailed Description.

At this point, we’ve built a total of 11 flows since part 4 of this series. That’s why I’d now like to update the schematic overview showing how all the flows work together—particularly which subflows are used where.

Next Steps
Now we’ve built the key actions that take place during a player’s turn. Next time, we’ll focus on how the turn passes to another player—and how the active player can actually open and run the Flow we’ve been working on over the past few installments.